

After double-booking myself for the fourth time in a row, it was time to take a step. For a long time, I kept looking for software that didn’t ask me to log in to another app (as I am quite frustrated with it). This is where I found Google Calendar’s appointment scheduling functionality.
As I started using it, its features kept me organized and streamlined all my appointments. Clients were pleased with the professionalism, and I was relieved, as I had been saved from double booking myself. It helped me to manage tasks and meetings more systematically.
As easy as it seems to use, it is also effective and seamless. After spending several weeks exploring it, here’s a guide that you can use to get started.
Google Calendar’s appointment slots vs Appointment Schedules
How to use Google Calendar: Web and Mobile app
On the Desktop version
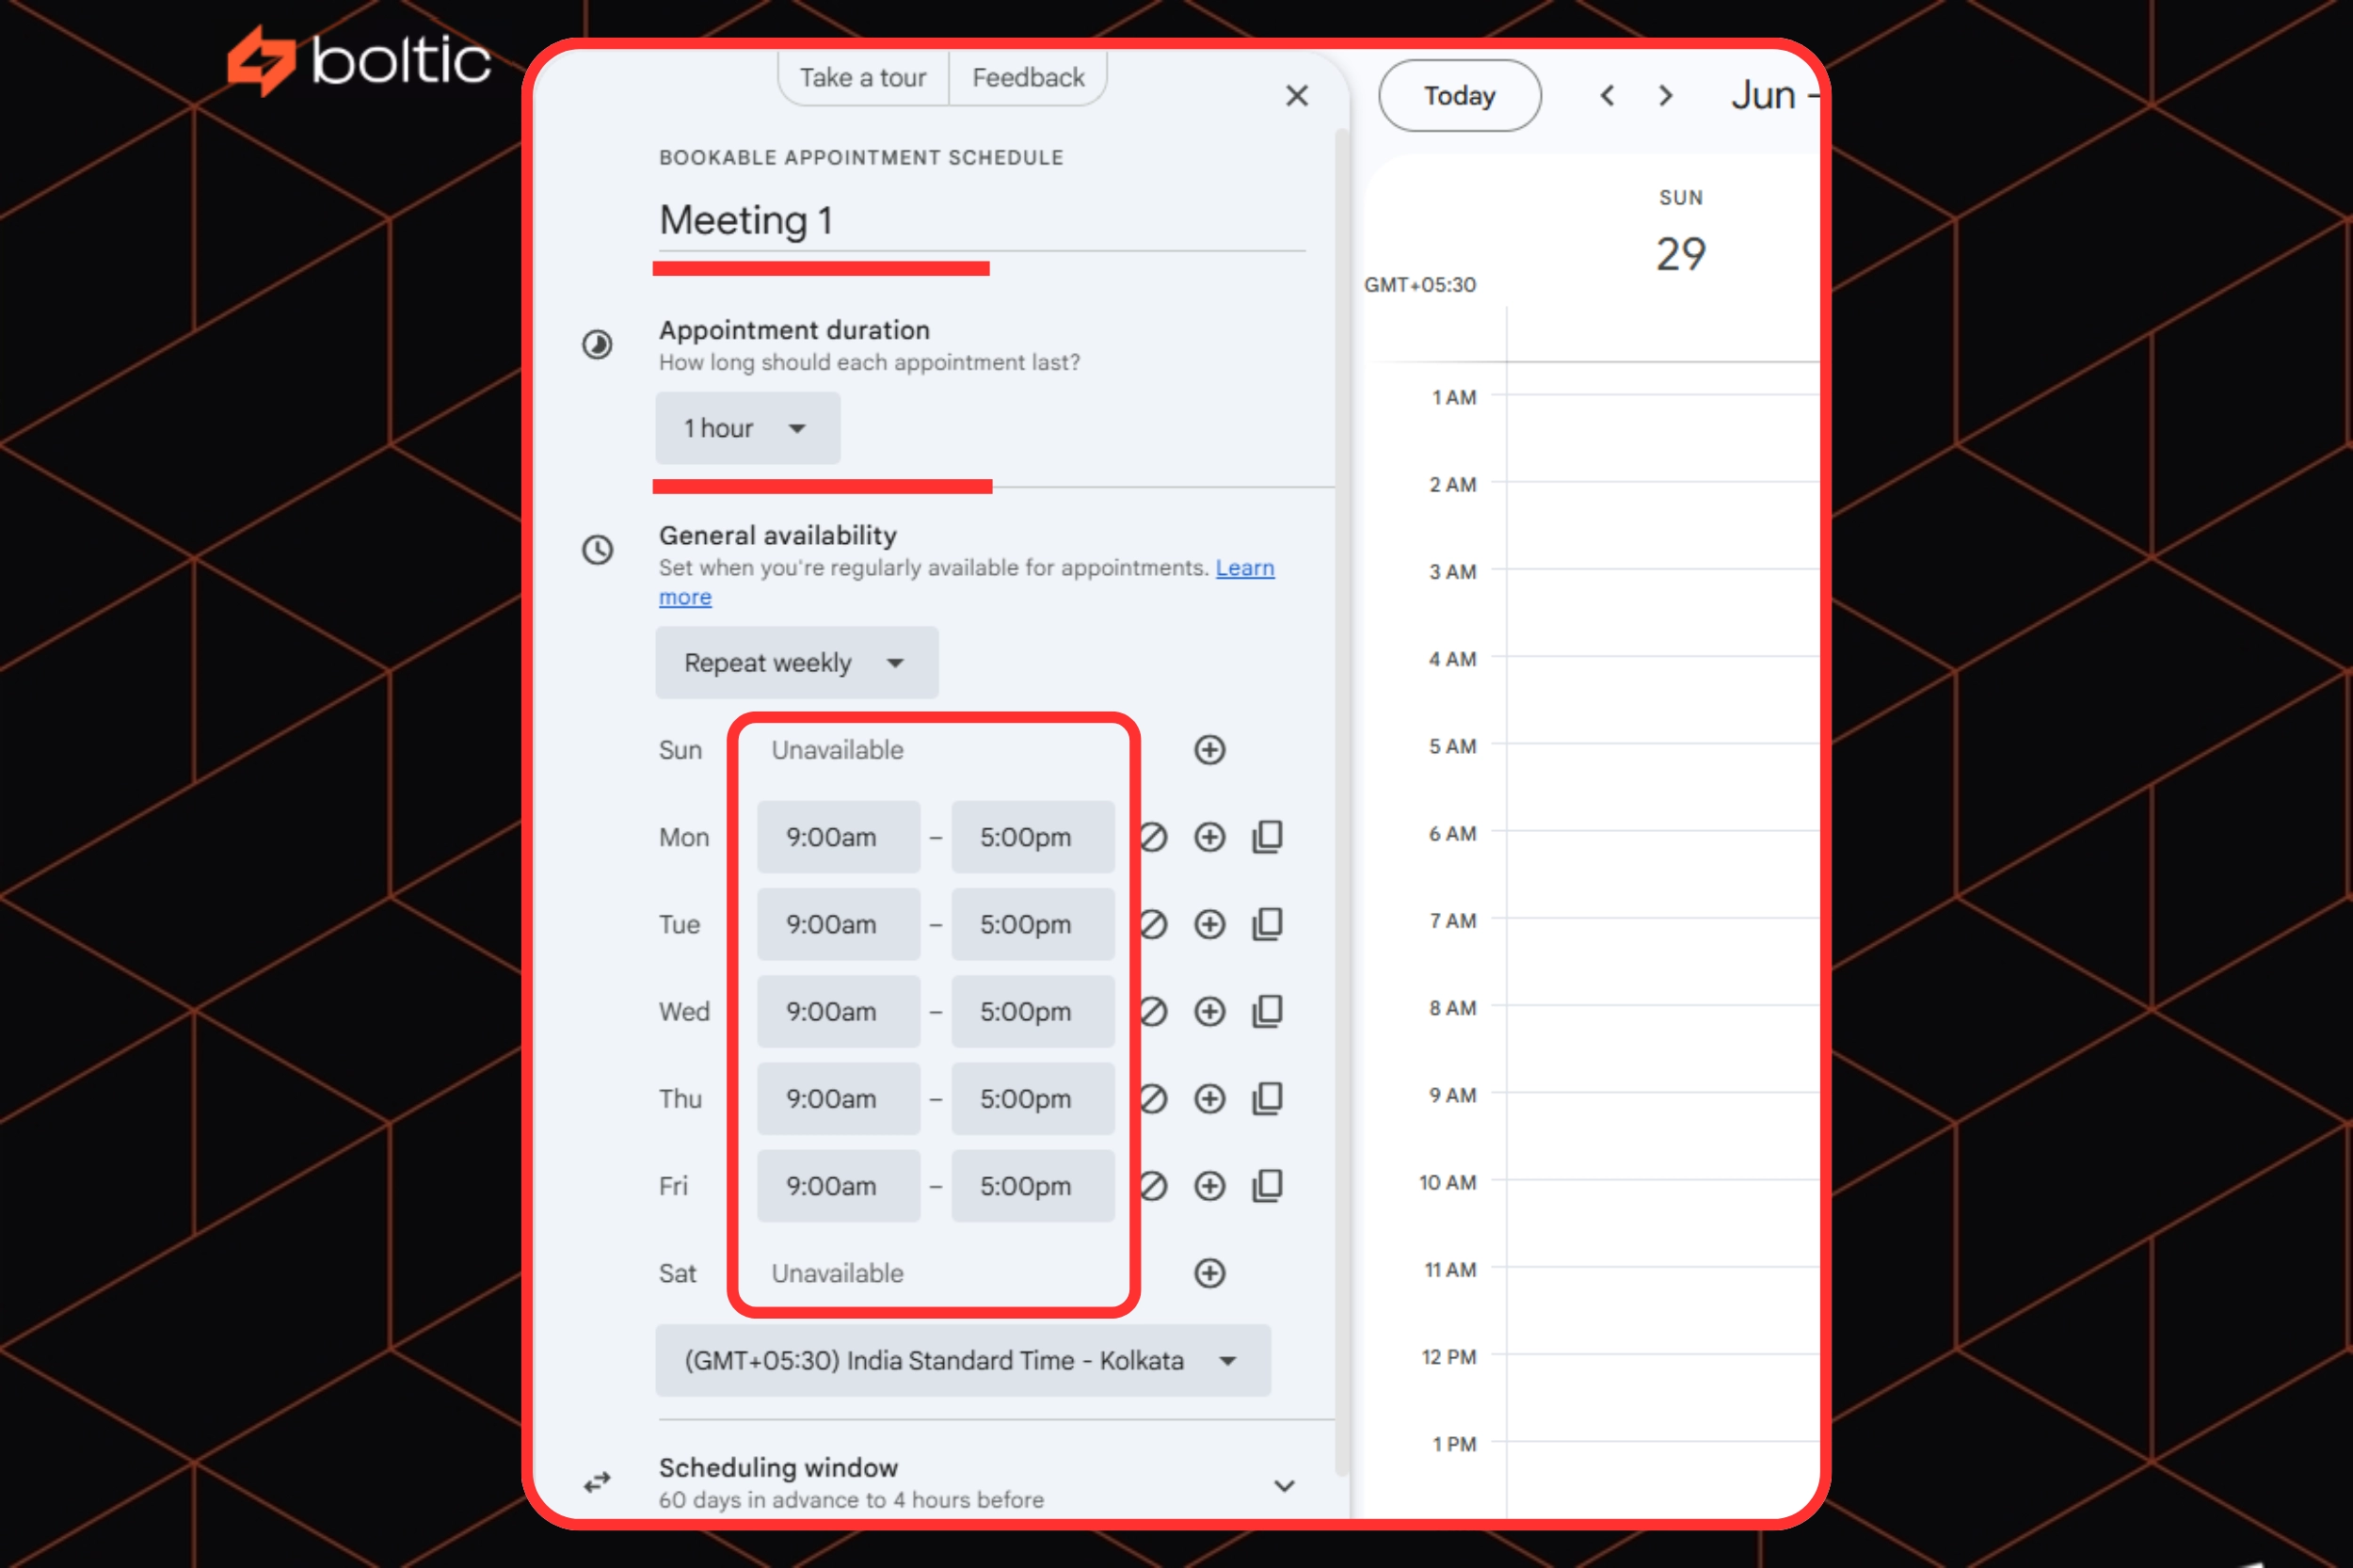
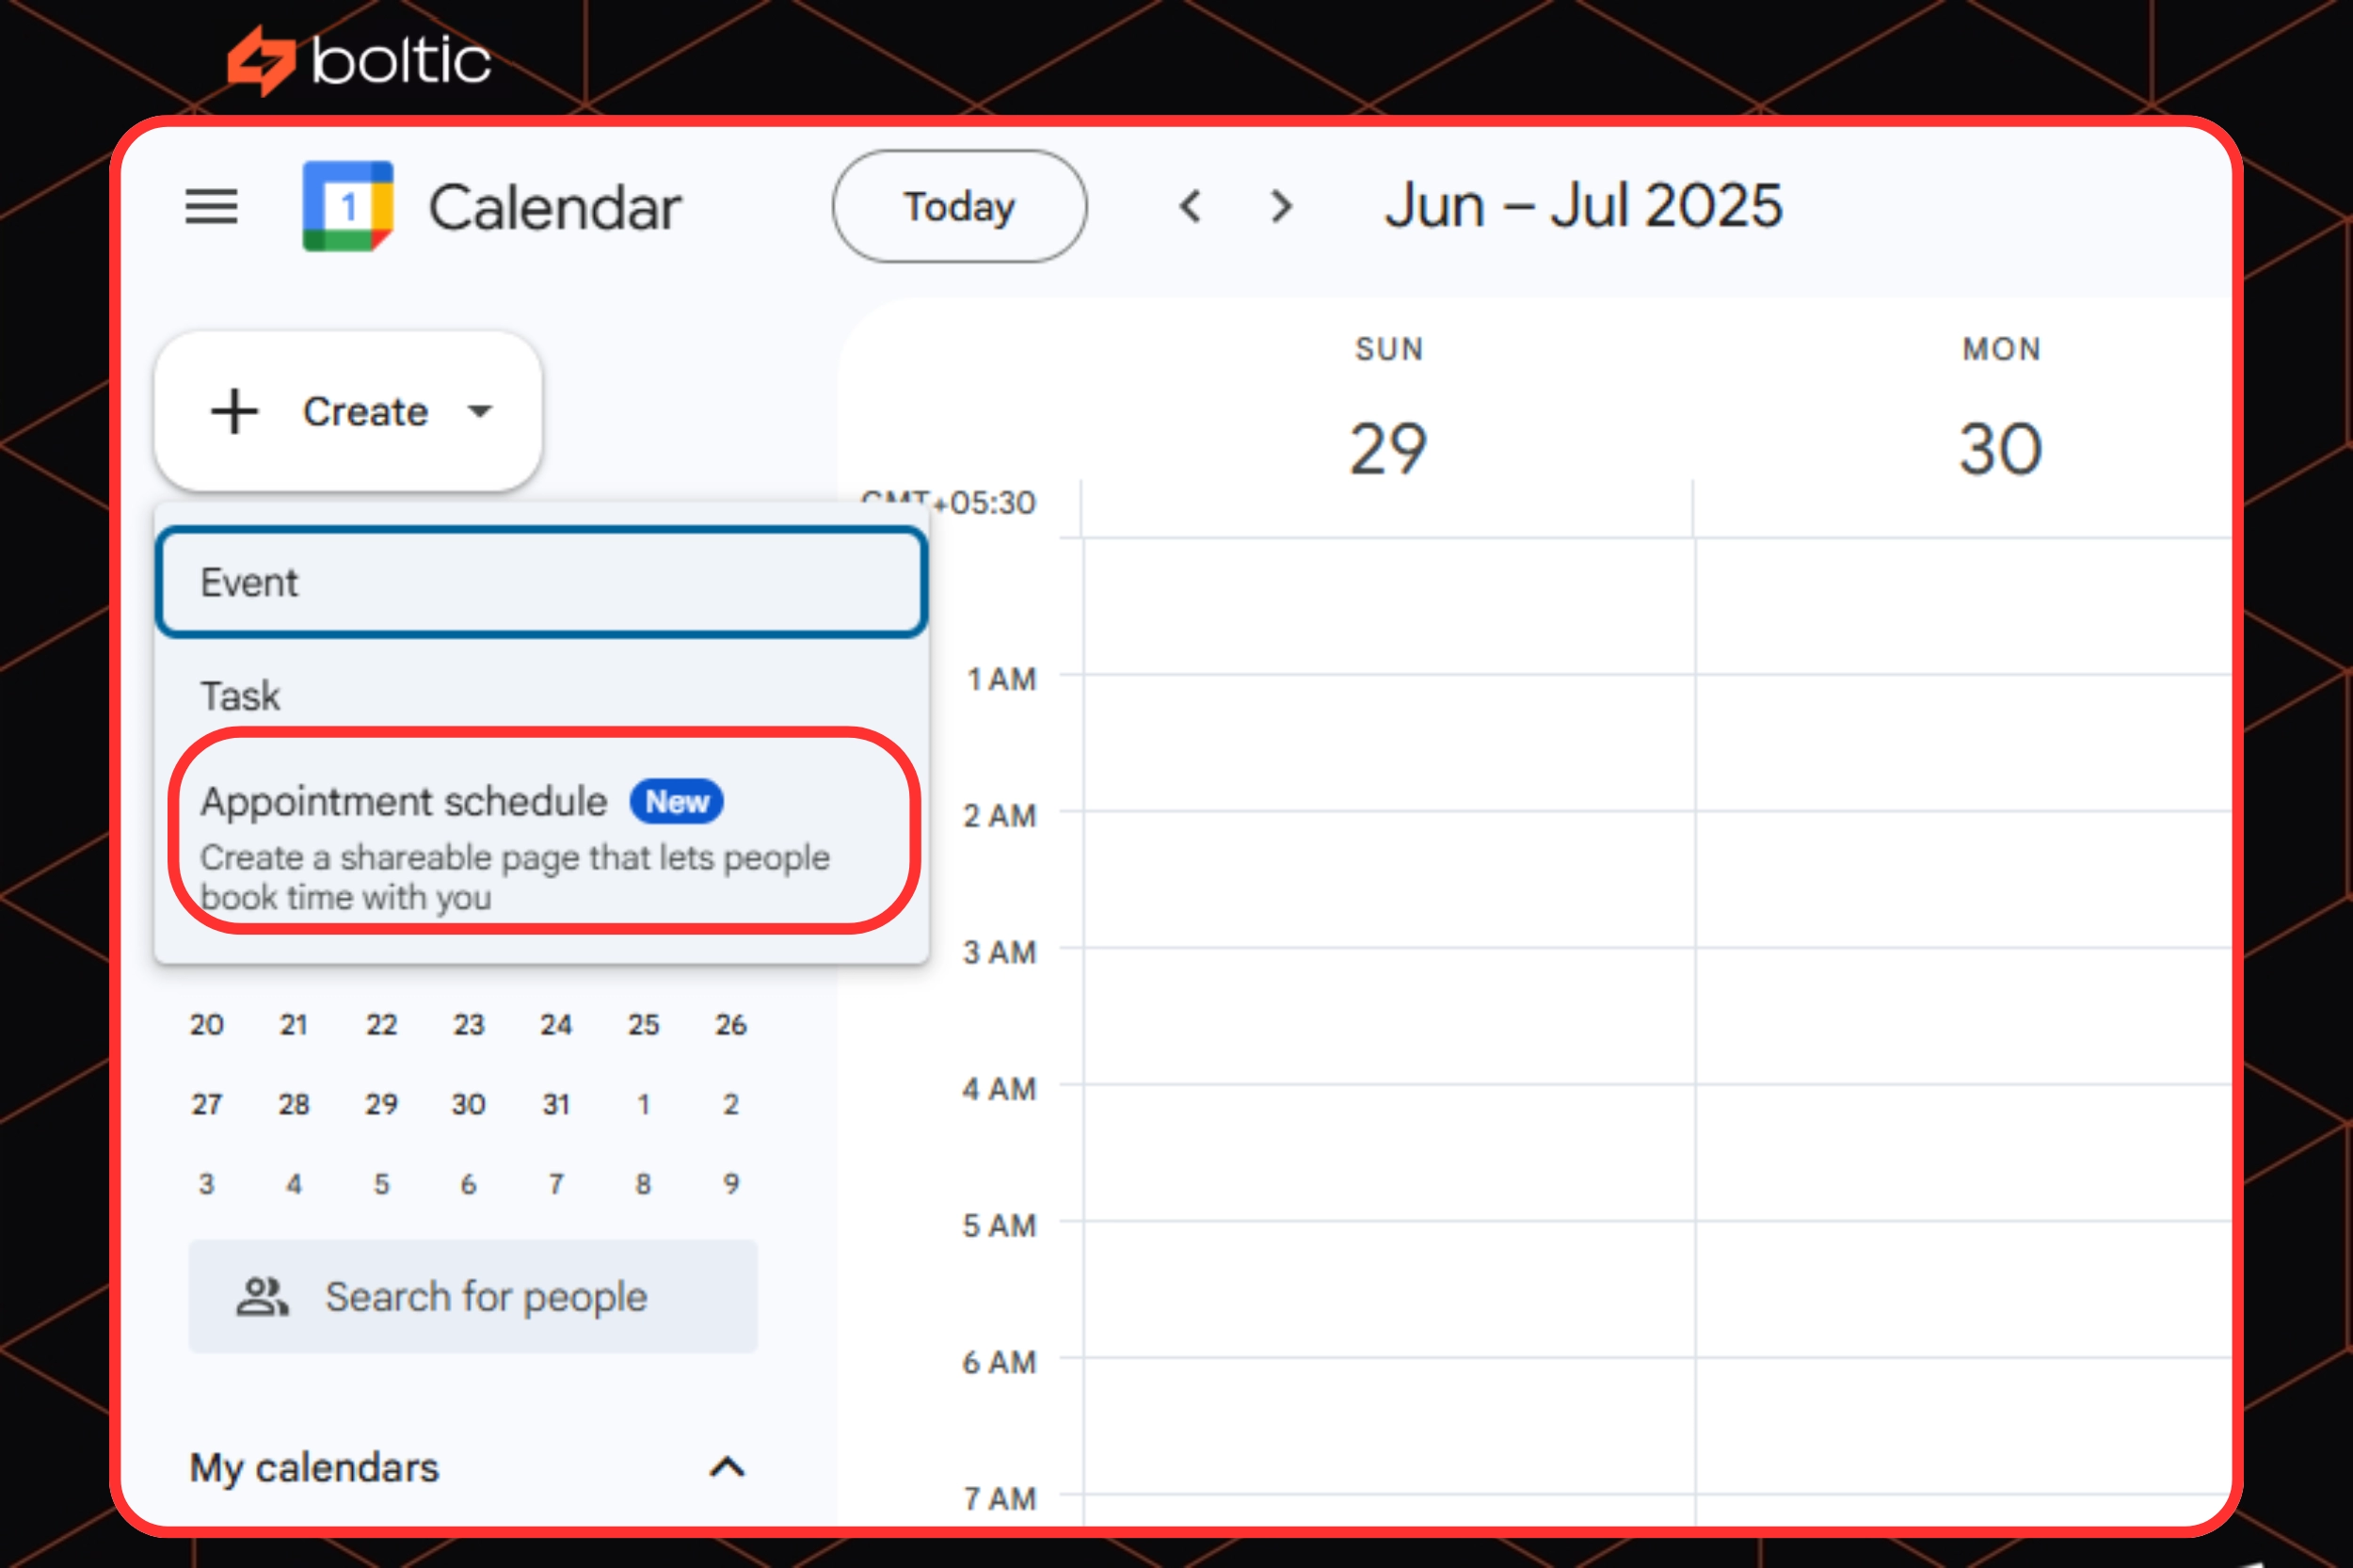
Step 1 - Create an appointment schedule
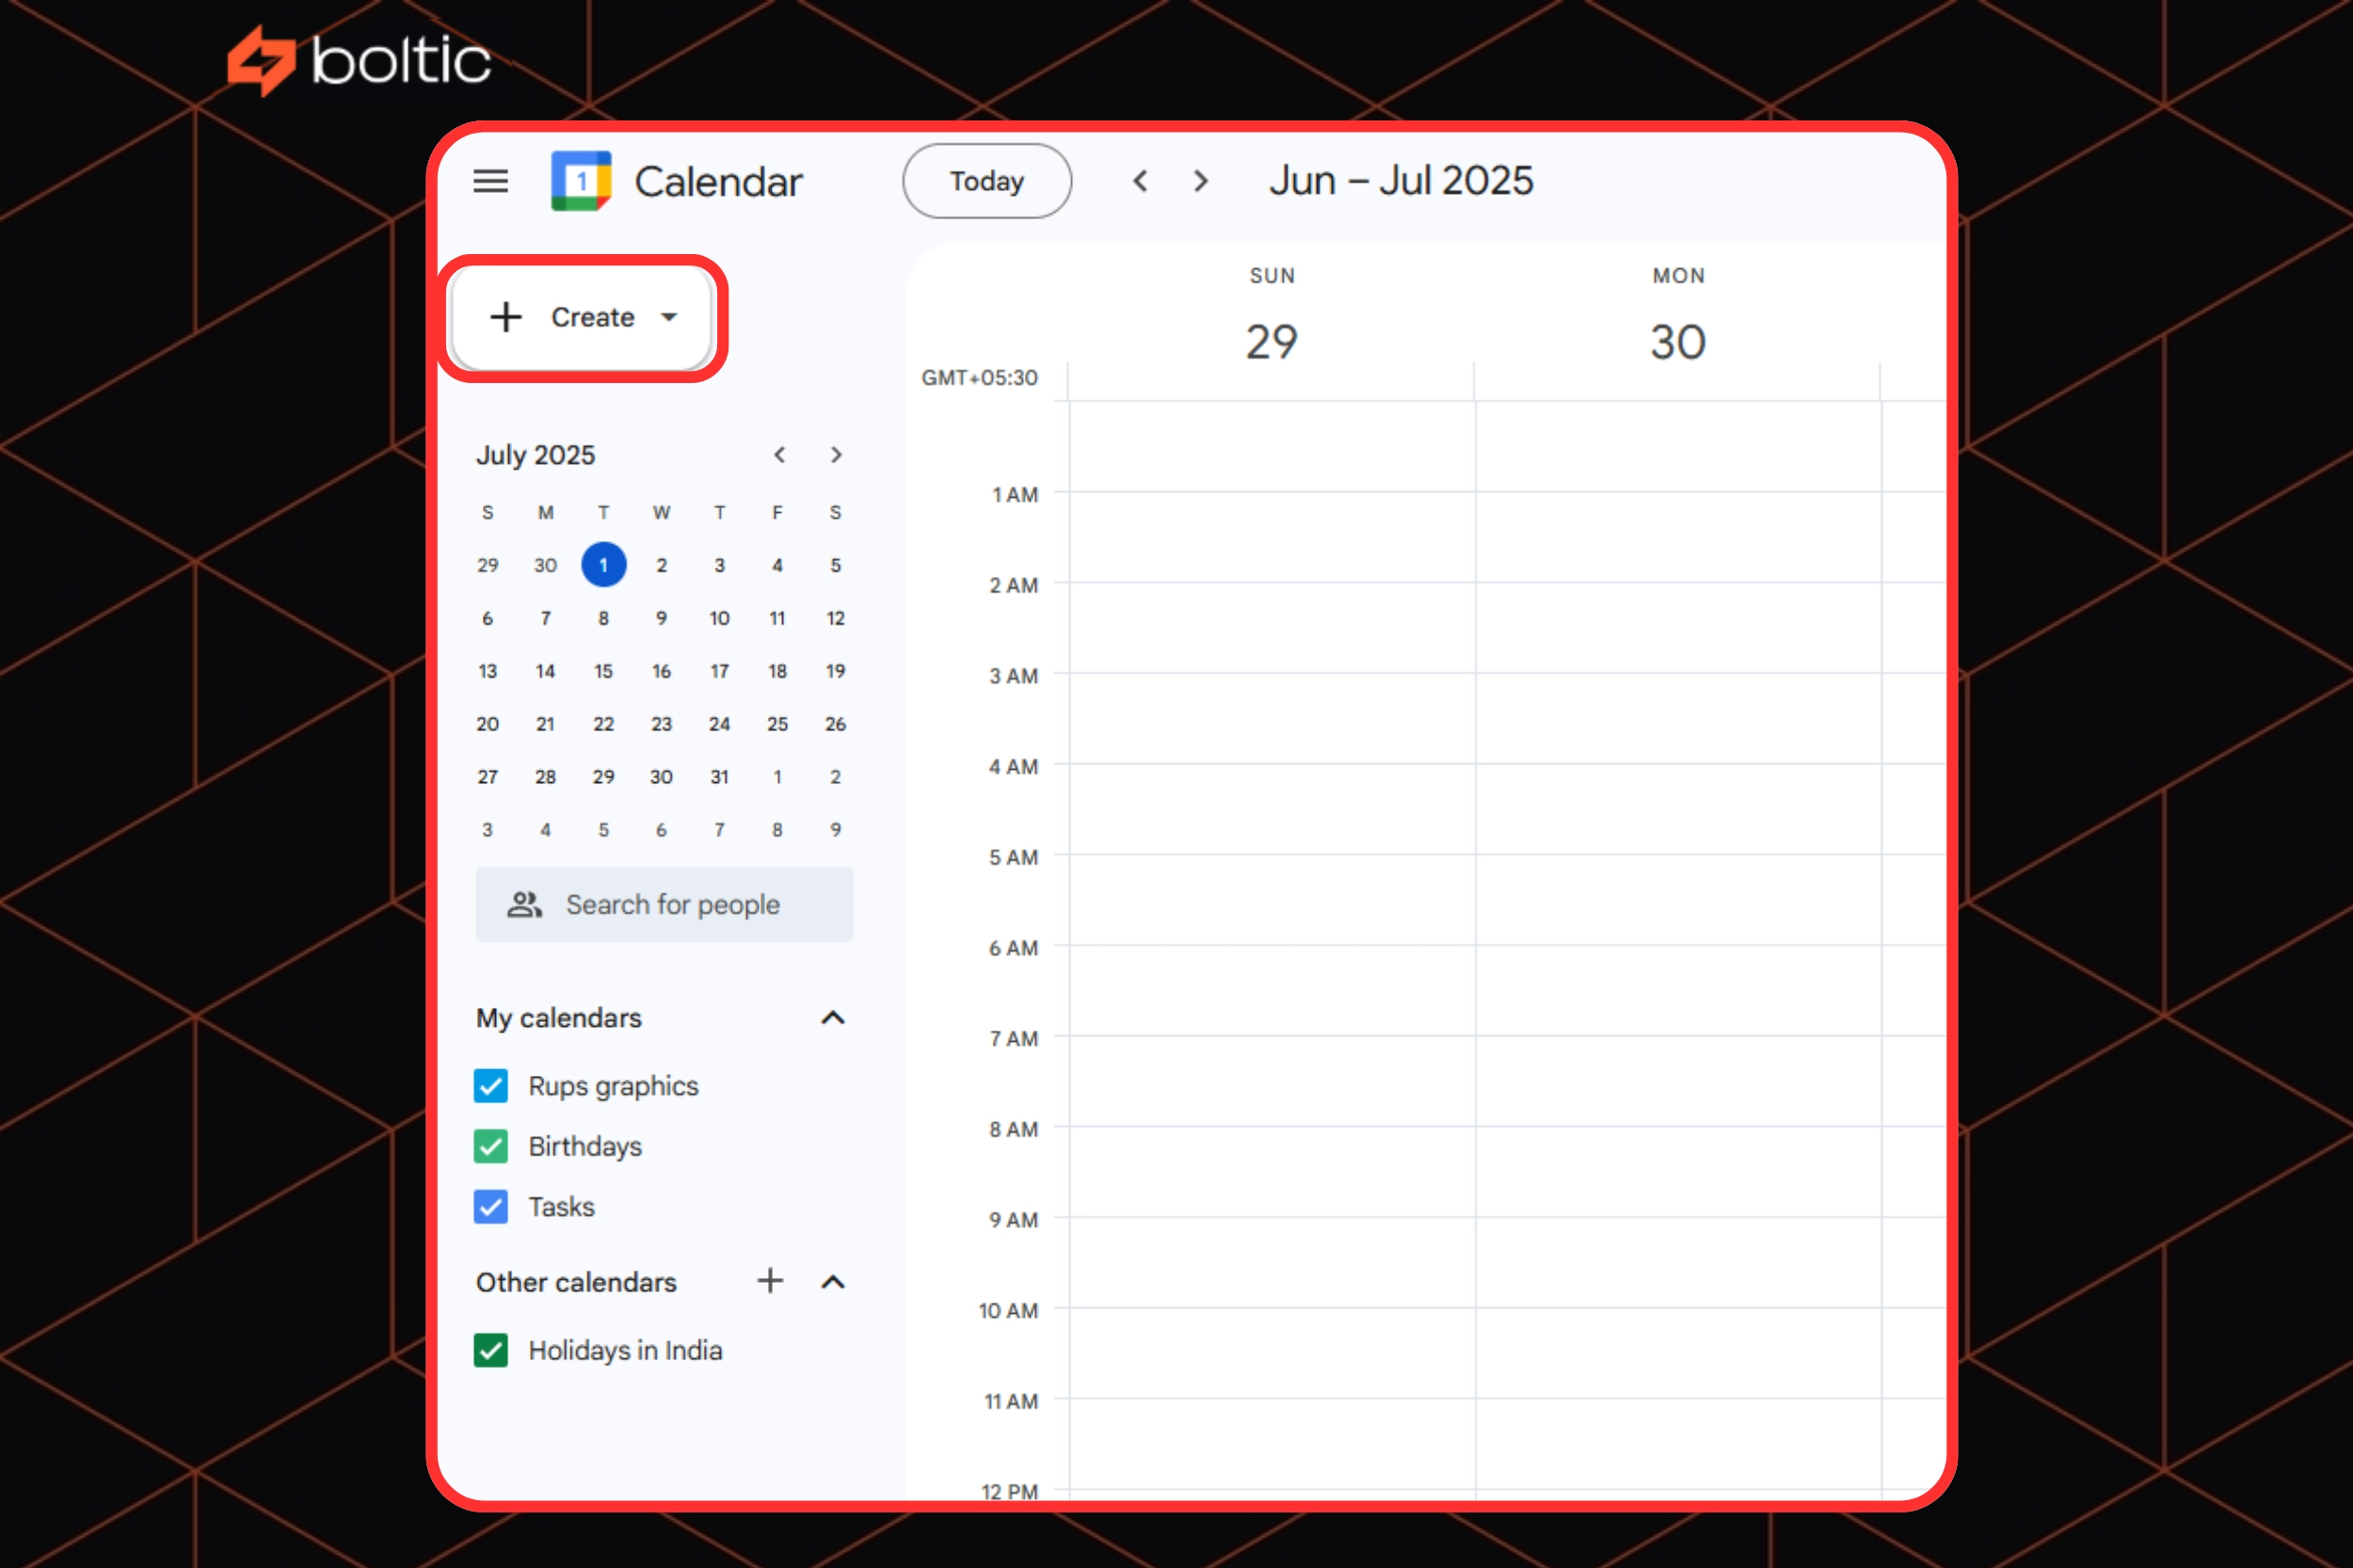
- Using the web browser, open the Google Calendar .
- On the top left side, click the ‘Create’ button.
- Tap on ‘appointment schedule’.
- Then, write a title for your schedule. For example, you may call it ‘Guidance sessions’.
- Next, set the duration. For instance, you may keep it to 30 or 45 minutes for a general meeting.
- Then, select the days and time when you want it to repeat. This will be under your general availability.
- Click ‘Next’ to move ahead.
Step 2 - Customize your booking page
- Choose your way for a meeting. Google Meet is offered by default. To use Zoom, you must install the Zoom for Google Workspace add-on and configure it manually.
- To avoid confusion, add a description for each of the scheduled appointments.
- Add the required fields in the booking form. It includes email, name, etc.
- To avoid spam bookings, you may enable email verification, available only on paid plans like Google Workspace Individual or Google One Premium.
- Once customized, click ‘Save’ to finalize the changes.
Step 3 - Add buffer time between the scheduled appointments
.webp)
- Tap on the appointment schedule you have already created.
- Click the ‘Edit’ button (pencil icon).
- Expand the section of ‘Booked appointment settings’.
- Check the box for Buffer time.
- Choose the buffer duration as per your needs. For instance, you can start with 10-15 minutes.
- Click ‘Next’.
- At last, click ‘Save’ to save the changes.
Step 4 - Share the booking link with the parties
.webp)
- Tap on the appointment schedule you want to share with the concerned party.
- Besides the ‘Open booking page’, click ‘Next’.
- Copy the desired link of the booking page.
- Share the copied link on your website, via Gmail, or even through social media platforms.
On Mobile app (Android, iOS)
Step 1 - Access all the appointment schedules
- Open the Google Calendar application on your mobile device (Android or iOS).
- Click ‘Menu’ (3 horizontal lines).
- On the calendar grid, you can check the scheduled events.
Tip: To create or edit an appointment schedule, it is always better to use its desktop version. Its mobile application does not fully support its functionality.
Step 2 - Share the booking link with the parties
- Tap on the appointment schedule you have already created.
- Click ‘Share’.
- Select the preferred method to share the booking link. This can include several apps, email, and messaging.
Remember, the sharing feature can vary as per device and app version.
Mobile vs Desktop UI: Key Differences
How to add your Google Calendar booking page to your website?
Step 1 - Simply create an appointment schedule
- Open Google Calendar using a web browser.
- Click ‘Create’ (you will find this in the top left corner).
- Select the ‘Appointment Schedule’ option.
- Fill in all the required details. It includes Title, appointment duration, available time slots, and the addition of co-hosts (optional).
- After filling in the required details, click ‘Next’.
- Then, customize your booking page. Using these features, you can customize location and conferencing, the Photo, the name of the booking page, the fields of the booking form, and even your Payments and cancellation policy (this is optional).
- Then, click ‘Save’.
Step 2 - Share your booking page
.webp)
Step 1 - On your calendar grid, simply click the appointment schedule that you have created.
Step 2 - Click ‘Share’ (you can find it beside the ‘Open booking page’ option).
Step 3 - Just below the website code, select one of the options as required:
- A single booking page - This shows one specific appointment. This is best for one event or service.
- All appointment schedules - This shows a page with all the links to all your booking calendars.
Step 4 - Click ‘Expand’ (down arrow) to open the ‘Online booking page’.
Step 5 - Adjust the height and width of your booking page, if required (this is optional).
Step 6 - Then, click ‘Copy code’
Step 7 - Once you have copied the code, paste it directly into the website’s HTML.
Step 8 - Then, click ‘Done’.
Note that the created booking pages are public and are not affected by your Calendar sharing settings. Anyone with that link can access your booking page, account name, and profile photo.
Step 3: Paste the Booking code on your Website
.webp)
- Open your business website (edit section). Then, go to its editor. For example, you may switch to the website editor in WordPress, Wix, or Squarespace.
- Paste the code of the booking page into its HTML. This is where the booking page will appear.
- Click 'Save' to save the changes.
- After checking everything, publish it.
It is important to remember that you may require some extra steps to add custom HTML. It varies as per platform. So, it is always safe to refer to he detailed instructions and then perform the activity.
How to Schedule a Meeting via Gmail?
Primarily, there are two options to schedule a meeting via Gmail.
Option 1: Create an Event via Gmail (Desktop/Laptop version)
.webp)
Step 1 - Open Gmail via a web browser (on your Laptop or Desktop).
Step 2 - Open the Email through which you want to schedule a meeting.
Step 3 - Click three vertical dots, ‘More’ option.
Step 4 - Click ‘Create event’.
Step 5 - A new tab of Google Calendar will open. It will come with pre-filled details. This will include Title (via email subject), Description (will include the email body), and Guests (this will be auto-filled using the data from that email thread).
Step 6 - If required, set the location, time, and date.
Step 7 - Once done, click ‘Save’.
Step 8 - To notify the participants, click ‘Send’.
Option 2: Suggest Meeting Times via Gmail (as per your availability)
- While you are replying to a particular email, you can simply click the ‘Calendar icon’ (you will find it at the bottom of the compose window).
- Select the option ‘Offer times you are free’.
- Then, a calendar view will appear. You can just drag and drop the time slots you are available.
- After selecting the available time slots, click ‘Next’.
- Add event title and other details.
- Click the option ‘Add to email’.
- Then, send it to that particular recipient.
- You can choose one recipient at a time. The meeting schedule will be automatically added to your Google Calendar.
Option 3: Add Events from Gmail to Google Calendar (To auto-sync events)
.webp)
To make sure that your Google Calendar and Gmail are synced for events like appointments, flights, and reservations, here are the ways:
Step 1 - Open Google Calendar using a web browser (on a Laptop or Desktop)
Step 2 - Select ‘Settings’ in the settings icon.
Step 3 - Click ‘Events from Gmail’ (you will find this in the left menu).
Step 4 - Ensure the ‘Automatically add events from Gmail to my Calendar’ option is selected.
Step 5 - Uncheck or check visibility for some specific events. Examples include flights, hotels, etc. (This step is optional).
It is important to note that all the features are available for those with a free Google Account.
How to create a Recurring Appointment in Google Calendar?
Creating a recurring appointment in Google Calendar is quite easy and simple. Just remember that the steps differ for Desktop/Laptop and Mobile devices.
For Desktop/Laptop
Step 1 - Open Google Calendar in a browser and sign up.
Step 2 - Click on the +Create button (on the top left side).
Step 3 - Add your date, event title, time, and other important details such as guests, location, and descriptionConnect Google Calendar with automation tools like Boltic and Notion. This will automate tasks easily.
Step 4 - Besides date/time, click on the ‘Does not repeat’ dropdown menu.
Step 5 - If you want to schedule a recurring appointment, you can choose to repeat it. Available options are:
- Daily
- Weekly on X day
- Monthly on X date
- Annually
- Or customize it. For example, you can say 'repeat every 2 weeks' or 'alternate days'. After customizing it, you can then set your preferred condition and location (if any).
Step 6 - Check everything and click 'Done'.
Step 7 - To confirm the schedule, click 'Save'.
For Mobile Devices - Android and iOS
Step 1 - Install the Google Calendar app on your phone and open it.
Step 2 - Click the +Create button (on the bottom right side).
Step 3 - Fill in the details to create an event. It will include date, title, and time.
Step 4 - Click ‘Does not repeat’ and choose a repeat option. If required, you can customize it.
Step 5 - Once completed, click ‘Save’ to confirm it.
How to edit and Delete an Appointment Schedule?
.webp)
Ways to edit an appointment schedule:
On Desktop/Laptop (via a web browser)
Step 1 - Open Google Calendar via a web browser
Step 2 - Tap on the Appointment schedule you wish to edit.
Step 3 - To edit, click on the pencil icon.
Step 4 - Edit the details like title, availability, and duration of an appointment.
Step 5 - Click ‘Save’.
On Mobile Devices (Android and iOS app)
Step 1 - Open the Google Calendar application on your Android or iPhone.
Step 2 - Click the appointment schedule to check first.
Step 3 - If you think no edits are required, simply tap on the 3 dots (⋮).
Step 4 - Doing so, you can either open the booking page or copy the link to a particular appointment schedule.
Step 5 - In case of any edits, click 'Edit' (pencil icon). This can help you edit the title, duration, availability, etc. Note that Mobile editing is limited. You may only see or share existing schedules. Editing fields like buffer time, co-hosts, Stripe, etc., is not supported on mobile. In short, mobile allows you to make basic changes, and thus it is better to adjust your schedule on the desktop version itself.
Step 6 - To save the edits you just made, click 'Save'.
Tip:
Ensure that you have enabled all the required permissions and have a strong data connection. Otherwise, it will hamper your editing in the mobile app.
How to delete an appointment schedule?
On Desktop/Laptop - via a web browser
Setp 1 - Access Google Calendar through your web browser on your Desktop/Laptop computer.
Step 2 - Click the appointment schedule you want to delete.
Step 3 - Then, tap on the ‘Delete appointment schedule’ option (you will find this at the top right corner of the appointment window).
Step 4 - To save the changes, confirm the deletion activity.
Remember, once you delete an appointment schedule, it will completely remove it from your calendar, and the booking page will not be visible anymore.
On Mobile Devices (Android and iOS app)
Currently, the feature of deleting an appointment schedule is not supported within the mobile application of Google Calendar. To delete them, you need to access a laptop or a desktop web version.
How to share appointment slots with other parties?
Option 1: Share appointment schedules via the Google Calendar app (Android and iOS)
Step 1 - Open the Google Calendar app on your Android/iPad/iPhone.
Step 2 - Click the appointment schedule you want to share (you will find this on your calendar grid).
Step 3 - Click ‘Share’
Step 4 - Choose any one option to share:
- Tap ‘Copy’ to copy the URL (on Android and iOS)
- If you wish to share the link via another app, click on that particular application.
Option 2: Add a Booking button to your Website (Desktop/Laptop)
.webp)
Step 1 - Access Google Calendar via your web browser (on your Desktop/Laptop).
Step 2 - Click on the ‘appointment schedule’ you want to share with other parties.
Step 3 - Click ‘Share’ (this is available beside ‘Open booking page’)
Step 4 - Below the website code, choose one of the following options:
- A single booking page - This shows one specific appointment. This is best for one event or service.
- All appointment schedules - This shows a page with all the links to all your booking calendars.
Step 5 - Besides the ‘Button with popup’, click the ‘Expand arrow’
Step 6 - Customize button colour and text. This is an optional step.
Step 7 - Click ‘copy’ code.
Step 8 - Then, paste that code into your website’s HTML editor.
Step 9 - At last, click ‘Done’.
Google Calendar: Free vs paid plans
Google Calendar vs Calendly: Feature comparison
Best Practices and Use Cases of Google Calendar
Use cases
- Consultants - Business consultants are often busy scheduling meetings with clients as per their actual availability. With the help of Google Calendar, a consultant can automate their Boltic workflow session-wise and transfer meeting notes to a Google Doc file to circulate within the team.
- Business Executives - High-level managers block the majority of their time from creating important strategies with their team. Thus, they often synchronize their calendars across all departments and limit the slots for client meetings. Here, Google Calendar helps manage their schedule and adds buffer times between tasks and meetings. This can help obtain approvals and facilitate follow-ups with higher authorities.
- Teachers/Educators - High school teachers have to create recurring events for each class. They often use several reminders in case of deadlines, and also share a calendar event with parents for PTA meetings. With a Google Calendar, a teacher can schedule 15-minute time slots for a 1:1 review session before exam week.
- Freelancers/Creative Professionals - People who are often working on creative projects juggle between managing client calls and internal work deadlines. To engage in deep work without any disturbance, it is important for them to block their time according to tasks. To make this hassle-free, they sync their Google Calendar with automation tools like Trello or ClickUp.
- Support teams - Backend or CRM teams extensively use Google Calendar to schedule their daily meetings to discuss rotational shifts, tasks and also use it to block their time for technical maintenance (if any). In fact, they sometimes even set colour codes to avoid coverage gaps.
Best practices to follow
1. Do not schedule more than 5-6 calls in a day. This will help you achieve better productivity.
2. Set 10-15 minutes of buffer time between the recurring meetings.
3. Use colour-coding for different events. This will keep this clear.
4. Connect Google Calendar with automation tools like Boltic and Notion. This will automate tasks easily.
5. Turn on reminders and notifications to stay on track.
6. Use the ‘Appointment Schedule’ feature for public bookings. This will ease out the process.
7. If you want to schedule routine tasks, prefer creating recurring events.
8. Block your work time so that you do not compromise on the important tasks.
9. Make use of the ‘shared calendars’ feature to ensure coordination is perfect across all the departments.
10. To edit on the go and stay updated in real time, sync it across all devices.
11. Don’t forget to add clear descriptions with proper resources, links, and agendas in each event.
How to Automate Google Calendar with Boltic?
Step 1 - Create a free acoount on Boltic.io
Sign up on the official website (Boltic.io) and log in to access its features.
Step 2 - Explore the Workflow Builder
Explore the features of the Workflow builder patiently. Doing so will help you create workflows effectively.
Step 3 - Integrate Google Calendar with the
Add Google Calendar as an application within the workflow. This. will further enable the writing and reading of all calendar events.
Step 4 - Set need-based triggers and actions
Define triggers and related actions based on your needs and requirements. For instance, creating several events in Google Calendar is an action.
Step 5 - Customize Workflow steps (as required)
As required, customize steps to make your Workflow ready to use. This way, you can set various automation sequences.
Step 6 - Start scheduling automations
To smoothly run your automations, use Boltic’s scheduler and set a custom or predefined date and time.
Step 7 - Integrate with other applications
To improve your workflow performance, it is better to integrate Google Calendar with other applications. Examples include Boltic Storage, Freshsales, and Google Sheets.
Step 8 - Test and deploy your workflow
After integration, you can finally run tests to ensure that your workflow operates well. Further, you can deploy it to automate your Google Calendar events smoothly.
drives valuable insights
Organize your big data operations with a free forever plan
An agentic platform revolutionizing workflow management and automation through AI-driven solutions. It enables seamless tool integration, real-time decision-making, and enhanced productivity
Here’s what we do in the meeting:
- Experience Boltic's features firsthand.
- Learn how to automate your data workflows.
- Get answers to your specific questions.

